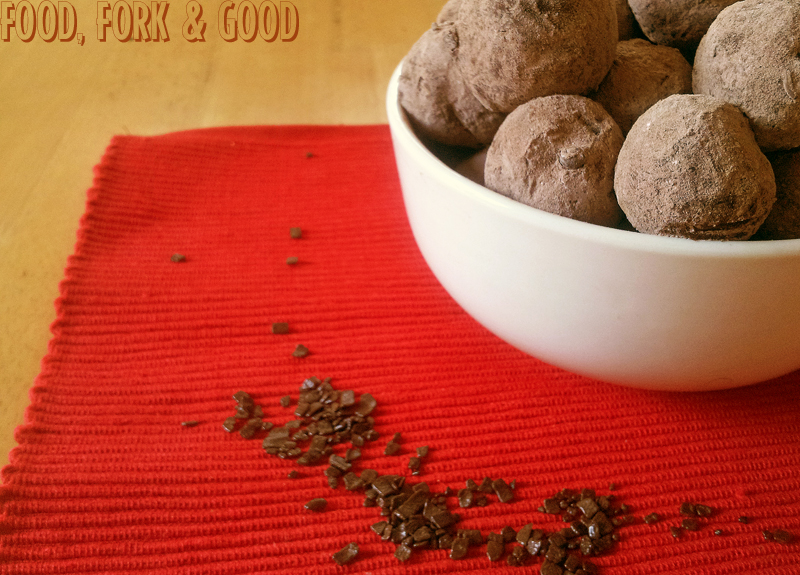
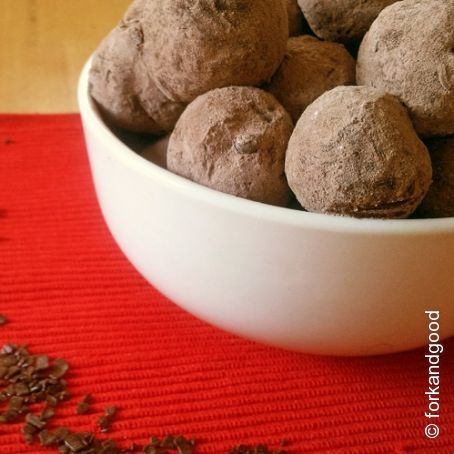
Richy Chocolately Stuff Truffles
Working with chocolate is usually a massive pain the wooden spoon. That's why I love making these truffles so much. All the fun of working with chocolate, no tempering or messing with thermometers....

Ingredients
- Ingredients you will need:
- 300ml double cream
- Tablespoon light soft brown sugar
- 200g chocolate spread (if you want to go nutty, use Nutella instead)
- 100g dark Chocolate (at least 60% cocoa)
- 300g Milk Chocolate (about 2 large Easter eggs)
- For coating you can use:
- Cocoa powder (the best)
- Icing sugar
- A mixture of cocoa powder & icing sugar
Details
servings 20
Level of difficulty Easy
Preparation time 10mins
Cooking time 5mins
Cost Average budget
Preparation
Step 1
First off, pour the cream into a large saucepan and stir in the sugar. Set the heat to high and keep stirring the whole time. Once the sugar has dissolved and the cream starts to get warm, get out a whisk and carefully whisk the cream until it goes a little frothy on top.
Step 2
Now add the chocolate spread, and whisk it in, letting it simmer for a few minutes. Make sure it is all combined before going onto the next step.
Remove from the heat and let it cool for a few minutes. Let it get to a temperature that you can comfortably dip your finger in but still hot enough to melt your chocolate.
Step 3
While your cream is cooling, take the chocolate (Both dark & milk) and chop it into smallish sized pieces. Pop it into the saucepan of cooled mixture and stir in until every last lump has melted and the entire mixture is combined. It will be very thick, but still gloopy and a little runny.
Pour into a bowl and leave to cool in the fridge for about an hour. Once it has firmed a little (it will still be sticky and gloopy but a little easier to shape, pour/scrape onto a large piece of greaseproof paper. Fold in the ends and roll into a log shape. Cover this with cling film and pop back in the fridge for about 12-15 hours. It will resemble a mummy- type log thing.
Step 4
When you take your log shaped chocolate mummy out of the fridge, it will be hard and not bend easily. Unwrap it from its paper tomb, and chop it into slices. (it will be firm but easy to cut.)
Step 5
Work quickly and limit the amount of touching as it melts very easily under human touch. (Hence the melt in the mouth sensation when you're eating them) Take a slice, squidge it into a ball and roll it in your palms to perfect the shape. You will get messy hands at this point. Try to do this as quickly as possible to limit the amount of melting.
Step 6
Next the coating. I went for a mixture of Cocoa Powder & icing sugar because I was running out of Cocoa Powder, but the best option is to go for just cocoa powder, it makes it very rich. Mix it onto a plate before rolling your balls (HA) in the powder.
Step 7
Pop back onto a tray and let them dry. (only takes a few minutes) Then they are done! You can eat them straight away.
I highly recommend licking the spoon, licking the saucepan (once it's cooled) and taking any excess from your chocolate mummy. To save on cleaning of course....
Like these recipes? Then you'll love
-
 Black bean brownies
4.6/5
(62 Votes)
Black bean brownies
4.6/5
(62 Votes)
Leave a comment about this recipe
Love this
Commented by Chris loves Cookies